Basic operations that can be perfomed on routes:
|
|
|
|
1. On the buttons bar, press ‘Open route’.
2. Select the route that you want to open.
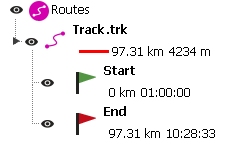
3. Once opened, the route will be displayed at map window and listed at the data tree.
•Activities calendar

Land has a calendar view that shows both activities, routes and waypoints by date of creation, in this way it will be much easier for you to find them.
1. In the button bar, click on 'Calendar'.
2. Double-clicking on an item will open it and center it in the map window.
The items will be displayed with the icon of your sport and distance. If a day has multiple activities, Land will display the value of your accumulated distance (the background will be darker the greater the distance for that day).
|
|
|
|
By opening the contextual menu you can:
•Activate the accumulated distance values for each week and month.
•Show an extended version of the calendar with several months instead of a single month.
IMPORTANT: Calendar not available in the Mac version of Land.
•Show a list of all the waypoints contained in a single route: This window shows you a list containing all the points that make up the selected route. From this window you can carry out several actions on route points.
|
|
|
|
1. At the data tree, open the contextual menu on ‘Routes’.
2. Select 'Points list'.
•Check the properties of a route: This window shows you a list of properties of the selected route (some parameters are editable).
|
|
|
|
1. At the data tree, open the contextual menu on the route.
2. Select 'Properties'.
•Zoom to a specific route: Focus the selected route at map window in just a click.
1. At the data tree, open the contextual menu on the route.
2. Select ‘Zoom to it’.
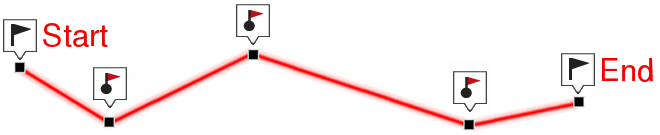
•Create a new route point by point:
|
|
1. At the button bar, click the 'Create track' button.
2. Once the track editor is displayed, press 'New track'.
3. A pop up window will be displayed, fill in basic data for the track you are about to mark: name, activity type, track colour line...
4. Move the pointer over the map and decide the exact location where the first track point will be marked.
5. Select the location of the second track point and repeat this action until the last point.
6. Once finished, click on 'Finish editing'.
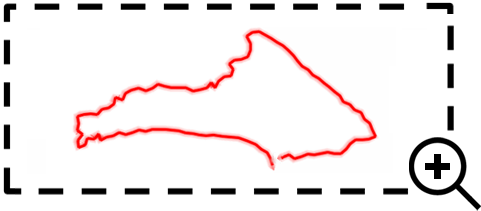
•Create a new route dragging the mouse:
|
|
|
|
1. At the button bar, click the 'Create track' button.
2. Once the track editor is displayed, press 'New track’.
3. A pop up window will be displayed, fill in basic data for the track you are about to mark: name, activity type, track colour line...
4. Move the pointer over the map and decide the exact location where the first track point will be marked.
5. At track editor, press 'Draw track'. Using your mouse, hold down left click and draw the itinerary you want to follow (free hand draw).
|
|
|
|
6. Once finished, click on 'Finish editing'.
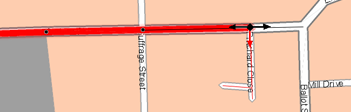
•Create a new route using a road map:
|
| |
|
|
|
1. At the button bar, click the 'Create track' button.
2. Once the track editor is displayed, press 'New track’.
3. A pop up window will be displayed, fill in basic data for the track you are about to mark: name, activity type, track colour line...
4. Move the pointer over the map and decide the exact location where the first track point will be marked.
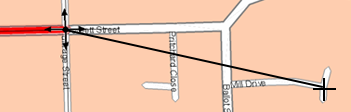
5. At the vectorial editor, press ‘FastTrack’. Arrows will be displayed on each intersection, each arrow indicates a different way to go, choose the path to take on each intersection.
|
|
|
|
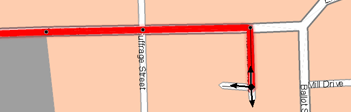
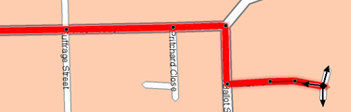
6. Repeat the same action on every intersection until you reach destination. You can also draw the whole track at once by pressing ‘Control’ at the same time that you select your destination. By doing this, Land will calculate the fastest route and generate the whole track from your current position up to the destination at once.
|
| |
|
|
|
7. Once finished, click on 'Finish editing'.
IMPORTANT: To perform this action you must use a vectorial map (*.VMAP)
•View a graph representation of a route:
|
|
|
|
|
|
|
|
Show a graphic representation of your routes by clicking 'Show graph' in the button bar. These are the available functions on graphs.
•Guiding Y axis: Bar serving as moving axis.
•Change data fields on the X/Y axis: Click the axis that you want to change and select the data field from a list of available data fields to choose from (altitude, speed, heart rate, cadence...).
•Moving graph: Use ‘Zoom’ buttons to sections of the graph with more detailed precision (graph scrolling can also be applied by dragging the graph up and down as well as laterally).
•Window zoom: Set the proportion of the zoom window to zoom in
•Automatic re-center: Press ‘Re-center’ button to automatically recenter the graph.
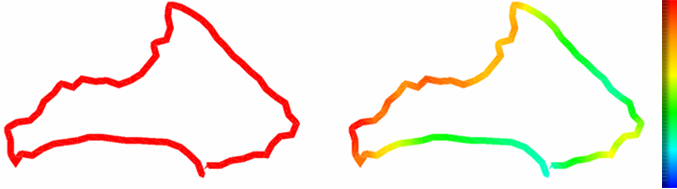
•Gradate the color of a track: Show the variation of a selected data field across the itinerary, for example, the altitude value for each of the track points.
|
|
|
|
1. Select the route you want to analyze.
2. On the button bar, press 'Gradate track color'.
•Save a route:
|
|
|
|
1. On the data tree, select the route that you want to save.
2. Open the contextual menu on the route and press ‘File > Save route’.
•Send to: Land offers you the possibility to transfer any route to several destinations (e-mail, Dropbox, Suunto watch, GPS, smartphone...):
1. Open the contextual menu on the item you want to transfer.
2. Once open, press 'Send to' and choose where you want to transfer the selected item. If you owe a new generation TwoNav GPS, you will be able to choose between transferring via USB cable or Wi-Fi.
3. File transfer will start and may take a few seconds.
IMPORTANT: Transfer options may vary depending on the selected item.